Imagine the aroma of freshly baked bread filling your kitchen, the kind of scent that instantly conjures comfort and connection. That’s the magic of homemade pizza dough. While grabbing a store-bought crust might seem convenient, crafting your own unlocks a world of flavor, nutrition, and pure satisfaction. From controlling every ingredient to tailoring it to your family’s unique tastes, this journey from simple flour to a delicious, healthy base is more rewarding than you might think. Let’s dive in and discover how easy it truly is to make the perfect pizza from scratch.
The Wholesome Advantage: Why Choose Homemade Pizza Dough?
In a world brimming with processed foods, taking control of what we eat is more important than ever. Choosing to make homemade pizza dough isn’t just about saving money; it’s a proactive step towards a healthier lifestyle, offering unparalleled ingredient transparency and the joy of creation. It transforms pizza night from a quick meal into a wholesome, engaging culinary experience for the whole family.

Unlocking Nutritional Control and Ingredient Transparency
When you bake from scratch, you are the master of your ingredients. This means saying goodbye to unwanted additives, preservatives, and excessive sodium often found in commercial pizza bases. You choose the flour, the oil, and the leavening agents, ensuring every bite is not only delicious but also aligned with your health goals. This transparency is a cornerstone of a truly healthy diet.
Beyond Processed: The Benefits of Wholesome Ingredients
Opting for ingredients like whole wheat flour or high-quality extra virgin olive oil provides superior nutritional benefits. You gain control over the amount of salt and sugar, allowing you to create a dough that’s naturally lower in unhealthy fats and higher in beneficial compounds like dietary fiber. This thoughtful selection supports better digestion and sustained energy.
Customization for Every Palate and Dietary Need
One of the greatest joys of homemade pizza dough is its incredible adaptability. Whether you’re catering to a family member with gluten sensitivities, looking to boost fiber intake, or simply want to experiment with different flavor profiles, a homemade base allows for endless customization. You can easily switch flours, add herbs, or incorporate unique spices to create a crust that truly speaks to everyone at the table.
The Satisfying Journey: From Flour to Flavor
There’s an undeniable sense of accomplishment that comes with baking from scratch. The tactile process of kneading, watching the dough proof and rise, and finally transforming it into a golden, bubbly crust is deeply satisfying. This hands-on experience not only connects you more deeply with your food but also fosters a memorable culinary adventure that store-bought options can never replicate.
Foundational Elements: Key Ingredients for a Simple and Healthy Pizza Dough
Crafting a delicious and healthy pizza dough begins with understanding the essential components that bring it to life. Each ingredient plays a vital role in the dough’s texture, flavor, and overall nutritional profile. Think of these as the building blocks for your perfect pizza masterpiece.
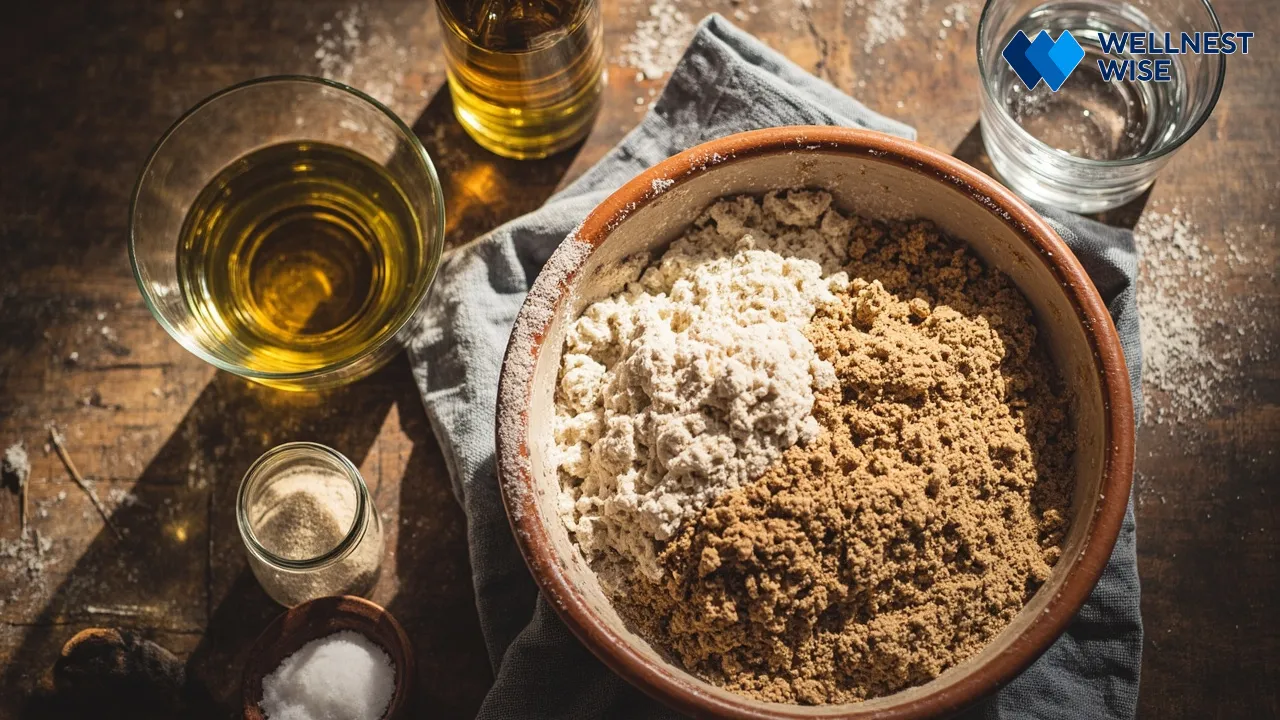
The Heart of the Dough: Choosing Your Flour Base
The type of flour you select significantly impacts the dough’s structure, flavor, and nutritional value. For a traditional, chewy crust, all-purpose flour is a common choice. However, for a health-conscious approach, exploring whole grain options can be incredibly rewarding.
Here’s a look at common flour types and their characteristics:
| Flour Type | Characteristics | Gluten Content | Nutritional Highlights | Best For |
|---|---|---|---|---|
| :——————- | :—————————————————- | :————- | :—————————— | :——————————————- |
| All-Purpose Flour | Light texture, consistent results | Medium | Basic carbohydrates | Classic, New York-style crusts |
| Whole Wheat Flour | Dense, nutty flavor, rustic texture | Medium-High | High dietary fiber, vitamins | Healthier, hearty crusts |
| Semolina Flour | Durum wheat, fine texture, golden hue, slightly gritty | High | Protein, earthy flavor | Chewy, crispy crusts (often mixed) |
| Gluten-Free Blends | Varies (rice, tapioca, almond, potato) | None | Tailored nutrients | For those with gluten sensitivity |
Activating the Rise: Understanding Yeast Varieties and Activation
Yeast is the magical ingredient responsible for your dough’s rise, creating that airy, bubbly texture. Without proper yeast activation, your dough simply won’t expand. It converts sugars into carbon dioxide, puffing up the dough and developing complex flavors.
Active Dry vs. Instant Yeast: What’s the Difference?
You’ll typically encounter two main types: active dry yeast and instant yeast. Active dry yeast requires “proofing” – dissolving it in warm water with a pinch of sugar to awaken it. Instant yeast, on the other hand, can usually be mixed directly with dry ingredients, saving a step, as it’s formulated to activate faster.
Mastering Yeast Activation Tips for Optimal Fermentation
For active dry yeast, ensure your water is between 105-115°F (40-46°C). Too cold, and the yeast won’t activate; too hot, and you’ll kill it. A pinch of sugar gives the yeast something to “eat,” helping it bloom. Look for a foamy layer after 5-10 minutes – that’s your sign of a lively, active yeast, ready to go to work.
Liquid Gold: The Role of Extra Virgin Olive Oil in Dough Texture and Flavor
Extra virgin olive oil is more than just a flavor enhancer; it’s a critical component for achieving tender, pliable dough. It contributes to a softer interior, a slightly richer flavor, and helps achieve a crispier crust when baked. Opt for a good quality olive oil for the best results, as its subtle fruitiness will shine through.
The Crucial Catalyst: Water Temperature and Dough Hydration
Water is essential for binding the ingredients and initiating gluten development. The temperature of the water is vital for yeast activation (as discussed above). Beyond temperature, the amount of water, known as dough hydration, dictates the dough’s texture and workability. A well-hydrated dough yields a lighter, airier crust, while too little water results in a tough, dense one.
Enhancing Taste: The Importance of Salt and a Touch of Sweetness
Don’t underestimate the power of salt. It doesn’t just add flavor; it also controls yeast activity and strengthens the gluten structure, contributing to a better rise and texture. A small amount of sugar (or honey) feeds the yeast, encouraging a robust fermentation and adding a subtle sweetness that balances the overall flavor profile of your crust.
Crafting Your Base: A Step-by-Step Guide to Easy Homemade Pizza Dough
Making pizza dough from scratch is a therapeutic and rewarding experience. This simple, step-by-step guide will walk you through each phase, ensuring you achieve a perfectly risen, flavorful dough every time. Don’t be intimidated; with a little practice, you’ll be a dough-master in no time!
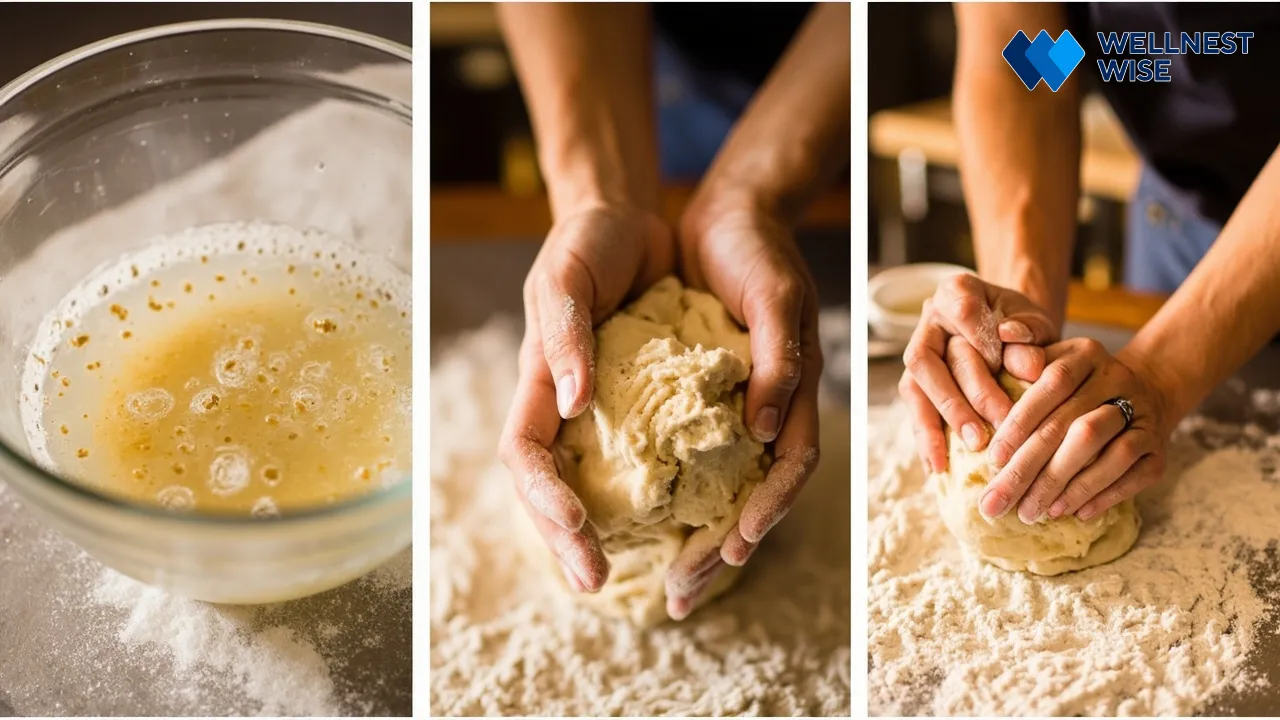
Phase 1: Preparing Your Yeast and Wet Ingredients
Start by combining your warm water (105-115°F or 40-46°C) with a pinch of sugar in a large bowl. Sprinkle your active dry yeast over the top and let it sit for about 5-10 minutes. You should see a foamy layer form on the surface, indicating the yeast is active and ready. If not, your yeast might be expired or the water temperature was off; it’s best to start again. Once foamy, stir in your extra virgin olive oil and salt.
Phase 2: Combining Dry Ingredients and Initial Mixing
In a separate bowl, whisk together your chosen flour (all-purpose, whole wheat, or a blend). Gradually add the flour mixture to your wet ingredients, mixing with a wooden spoon or a spatula until a shaggy, somewhat sticky dough forms. At this point, resist the urge to add too much extra flour; the dough will come together more during kneading.
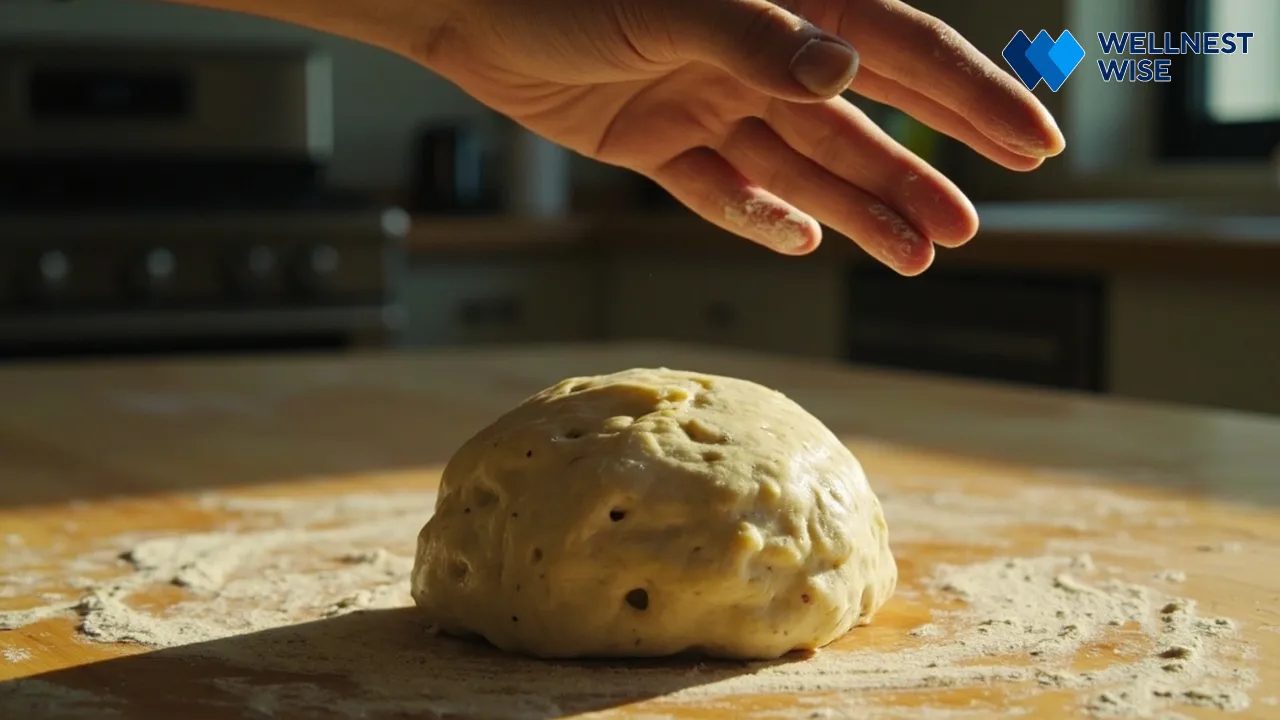
Phase 3: The Art of Kneading for Optimal Gluten Development
Kneading is crucial. It develops the gluten, which creates the elastic structure needed for a chewy, airy crust. Aim for 8-10 minutes of kneading until the dough is smooth, elastic, and no longer sticky. You should be able to gently stretch a small piece of dough without it tearing immediately (the “windowpane test”).
Hand Kneading Techniques for Beginners
If hand kneading, lightly flour a clean surface. Push the dough away from you with the heels of your hands, fold it back over itself, turn it a quarter turn, and repeat. Use a rhythm, applying steady pressure. It might feel a bit sticky at first, but as the gluten develops, it will become smoother and more manageable.
Using a Stand Mixer: A Time-Saving Approach
For a less hands-on approach, a stand mixer with a dough hook attachment is a game-changer. Mix on low speed for 2 minutes to bring the dough together, then increase to medium-low and knead for about 6-8 minutes. The dough should gather around the hook and pull cleanly away from the sides of the bowl.
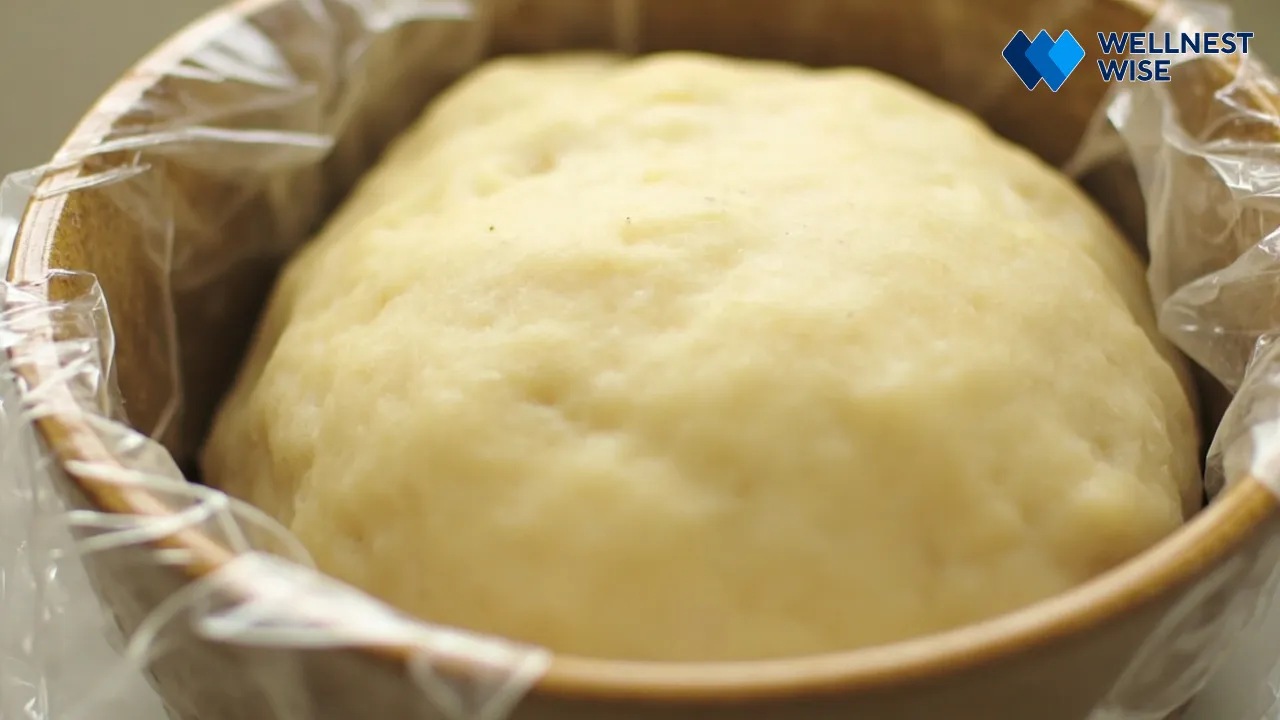
Phase 4: The First Rise – Proofing for Flavor and Volume
After kneading, form the dough into a ball and place it in a lightly oiled bowl, turning to coat. Cover the bowl tightly with plastic wrap or a damp towel to prevent drying. This period, known as proofing, allows the yeast to work its magic, fermenting and expanding the dough.
Ideal Proofing Environment and Time Considerations
For the first rise, place the covered bowl in a warm, draft-free spot. A slightly warm oven (turned off, or on low for a minute then off) or a sunny spot can work. Depending on the room temperature and yeast activity, the dough typically needs to rise for 1 to 1.5 hours, or until it has doubled in size.
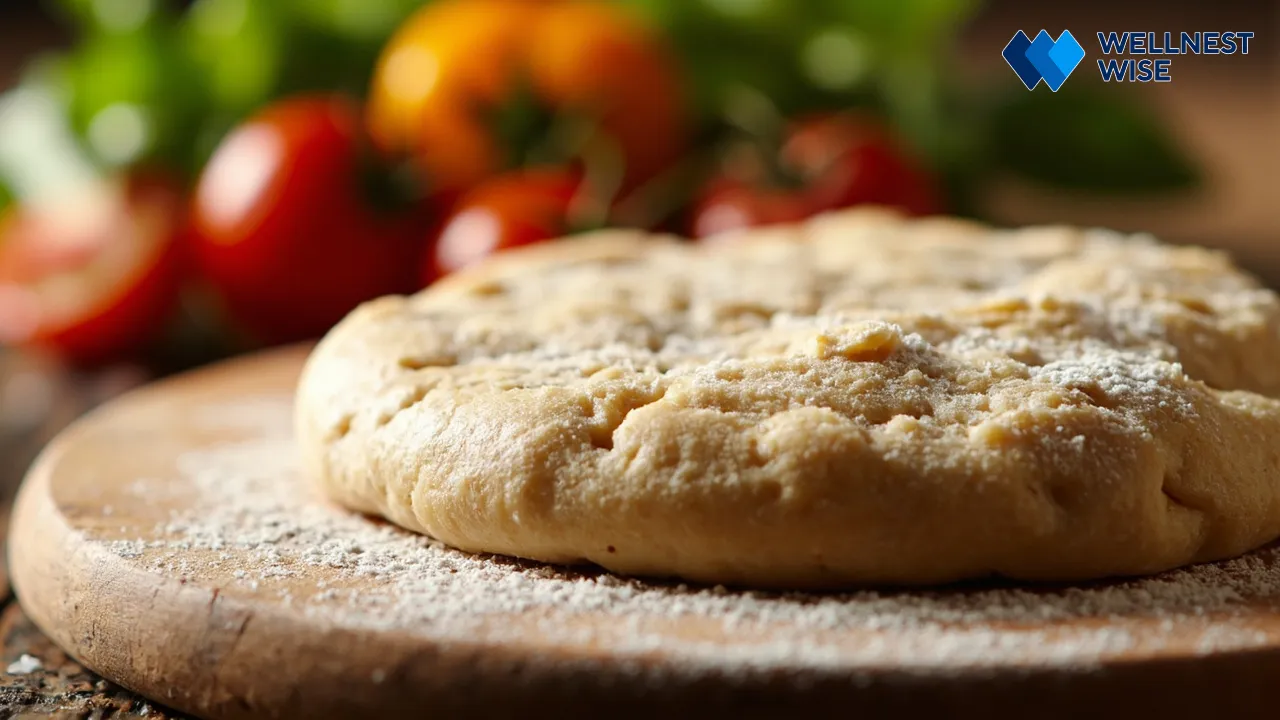
Phase 5: Shaping Your Dough for the Perfect Pizza Crust
Once risen, gently punch down the dough to release the air. This step helps create a finer, more even crumb. Divide the dough into portions for your desired pizza size. On a lightly floured surface, use your hands or a rolling pin to gently stretch or roll the dough into your desired crust shape and thickness. Be careful not to tear it, especially around the edges, as this can affect the rise during baking.
Nutritional Evolution: Healthy Adaptations for Every Diet
Embracing homemade pizza dough offers a fantastic opportunity to tailor your meal to specific dietary needs and boost its nutritional value. From increasing dietary fiber to accommodating gluten sensitivities, there’s a healthy dough option for almost everyone.
Boosting Fiber: Embracing Whole Wheat and Ancient Grains
Swapping out some or all of your all-purpose flour for whole grain alternatives is one of the easiest ways to make your pizza dough healthier. These flours retain the bran and germ, which are packed with nutrients.
The Benefits of Whole Wheat Pizza Dough for Digestive Health
Whole wheat pizza dough significantly increases your intake of dietary fiber, which is crucial for digestive health, blood sugar regulation, and prolonged satiety. The complex carbohydrates in whole grains provide sustained energy, unlike refined flours that can lead to quick sugar spikes. While it might be a bit denser, its rich, nutty flavor is a delicious trade-off.
Incorporating Other Nutritious Flours: Spelt, Einkorn, and More
Beyond whole wheat, consider experimenting with other ancient grains like spelt or einkorn flour. Spelt offers a slightly sweet, nutty flavor and a more tender crumb than traditional whole wheat. Einkorn, an ancient form of wheat, has a distinct flavor profile and a different gluten structure that some find easier to digest. Start by substituting 25-50% of your all-purpose flour with these nutrient-dense options.
Gluten-Free Alternatives: Delicious Dough Without Compromise
For those avoiding gluten, delicious gluten-free pizza dough alternatives are readily available. These often involve a blend of flours and specialized binders to mimic the properties of gluten.
- Common `gluten-free blends`: Many commercial blends combine flours like rice, tapioca, potato starch, and sorghum. You can also create your own with a base of brown rice flour, adding a bit of tapioca starch for chewiness and a small amount of almond or oat flour for flavor.
- Essential binders: Since gluten is absent, binders are crucial. Xanthan gum or guar gum, usually just a teaspoon or two per cup of flour, are essential for providing elasticity and preventing the dough from crumbling. Psyllium husk powder can also be used, adding both binding properties and a fiber boost.
- Considerations for optimal texture and rise: Gluten-free doughs often benefit from slightly longer mixing times and a slightly higher hydration level. They might not rise as dramatically as traditional dough, but proper ingredient ratios and adequate proofing time can still yield a light and airy crust.
Exploring Sourdough: Fermentation for Enhanced Gut Health and Flavor
For the adventurous baker, sourdough pizza dough offers incredible depth of flavor and unique health benefits. Sourdough relies on wild yeasts and bacteria present in a “starter” for fermentation, rather than commercial yeast.
The Science of Fermentation and Its Nutritional Impact
The prolonged fermentation process in sourdough breaks down complex carbohydrates and gluten, potentially making it easier to digest for some individuals. This process also increases the bioavailability of certain nutrients and can introduce beneficial probiotics, supporting gut health. Plus, the tangy, complex flavor of sourdough crust is simply unparalleled.
Reducing Carbs: Creative Approaches for Dietary Preferences
For those on a lower-carb diet, traditional flour-based dough can be a challenge. However, innovation in healthy baking has led to several creative solutions. Cauliflower crusts, while not a true dough, offer a vegetable-rich, low-carb base. Almond flour or coconut flour, often mixed with eggs and cheese, can also create a surprisingly good, although denser, low-carb “pizza” base. These options allow you to enjoy pizza night without the carb load.
Achieving Culinary Perfection: Tips for the Best Pizza Dough Texture
A truly great pizza isn’t just about the toppings; it’s anchored by a crust with the perfect balance of chewiness, crispness, and flavor. Mastering the nuances of dough preparation is key to achieving that elusive “culinary perfection” that will have everyone asking for your recipe.
The Importance of Hydration Levels for Elasticity and Crispness
Dough hydration, the ratio of water to flour, is paramount. A higher hydration dough (more water relative to flour) tends to be stickier and harder to handle but yields a lighter, more open crumb with a fantastic crisp exterior. A lower hydration dough is easier to work with but can result in a tougher, denser crust. Aim for a hydration level around 60-70% for a good balance of elasticity and crispness.
Understanding Gluten Development for Optimal Chew
Proper gluten development is what gives pizza dough its characteristic chewiness and strength. This occurs through kneading. Insufficient kneading leads to a weak, crumbly dough that won’t hold its shape or rise well. Over-kneading, however, can make the dough tough and difficult to stretch. The “windowpane test” (stretching a small piece until it’s translucent without tearing) is your best friend here, indicating optimal gluten formation.
Maximizing Flavor: Extended Proofing Time and Cold Fermentation
For a truly complex flavor, consider an extended proofing time or even cold fermentation. After the initial rise, you can refrigerate your dough for 24-72 hours. The slow, cold fermentation allows the yeast and enzymes to work longer, developing richer, more nuanced flavors and a more digestible crust. Think of it as aging your dough, much like a fine wine.
Handling Your Dough: Gentle Techniques for Superior Results
Once your dough is perfectly proofed, handle it with care. Overworking or deflating the dough too aggressively can expel too much of the precious carbon dioxide bubbles, leading to a flat, dense crust. When shaping, use gentle, pushing motions from the center outwards, preserving the airy pockets, especially around the rim, which will become your beautiful, bubbly cornicione.
Plan Ahead: Effective Storage Methods for Your Homemade Pizza Dough
One of the great advantages of making homemade pizza dough is the ability to prepare it in advance, making weeknight pizza nights a breeze. Knowing how to properly store your dough ensures you always have a fresh, ready-to-use base on hand, saving you time and effort.
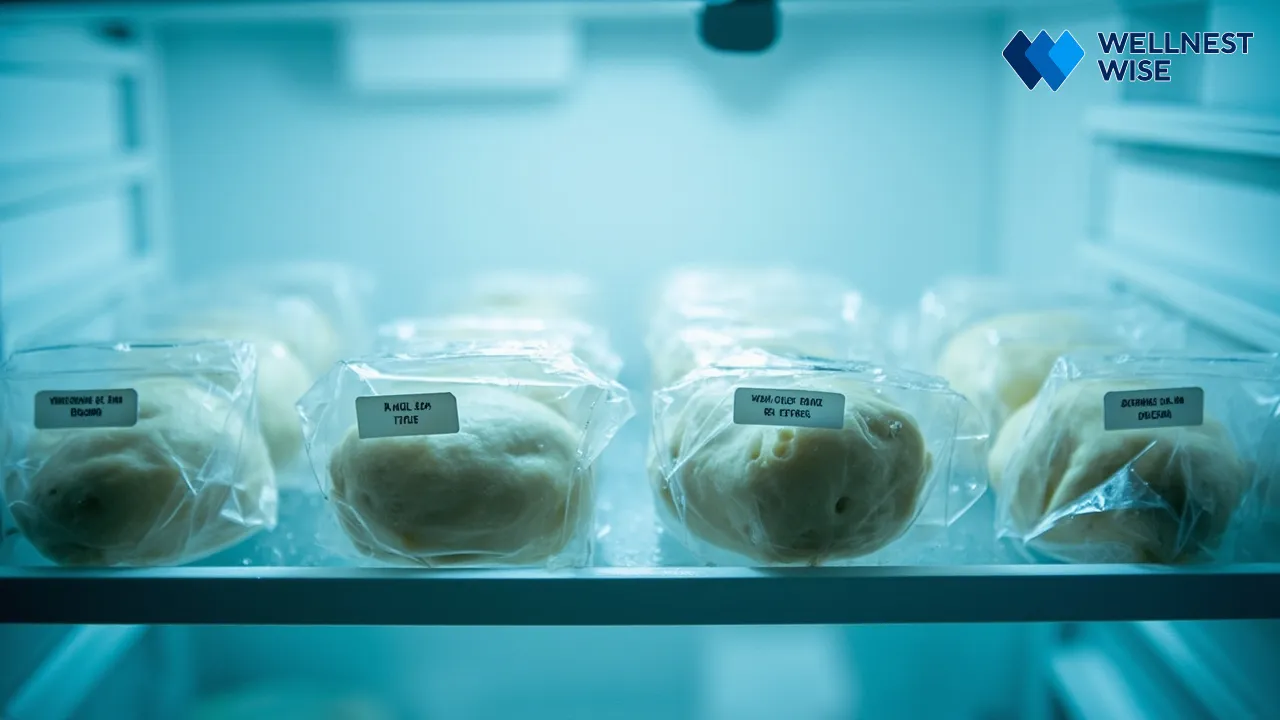
Refrigeration: Preparing Dough for Future Pizza Nights
Refrigeration is an excellent way to slow down the fermentation process, allowing you to prepare your dough a few days ahead. This method also encourages cold fermentation, which develops deeper, more complex flavors in your crust.
Optimal Storage Duration and Best Practices
After the first rise, gently deflate the dough, shape it into individual balls (one per pizza), and lightly coat each with olive oil. Place them in separate airtight containers or sealable bags, ensuring there’s room for a little expansion. Refrigerate for up to 3-5 days. Before use, remove the dough from the fridge about 1-2 hours prior to allow it to come to room temperature and relax, making it easier to stretch.
Freezing for Long-Term Convenience: A Practical Guide
For even longer storage, freezing is your best option. It’s perfect for batch baking and ensures you’re always ready for an impromptu pizza party. Properly frozen dough can last for several months.
Thawing and Re-proofing Frozen Dough
Once your dough has completed its first rise, punch it down gently, form it into balls, and lightly oil each. Place them on a baking sheet lined with parchment paper and freeze until solid (about 2-3 hours). Once solid, transfer the dough balls to individual freezer-safe bags, squeezing out as much air as possible. To thaw, transfer a frozen dough ball to a lightly oiled bowl in the refrigerator overnight, or on the counter for 3-4 hours. It will need a second proofing at room temperature until doubled in size before shaping and baking.
Essential Tips for Preserving Freshness and Quality
Always use airtight containers or bags to prevent the dough from drying out or absorbing refrigerator odors. A light coating of olive oil on the dough surface also helps maintain moisture. When freezing, label your containers with the date so you know exactly how long they’ve been stored. Properly stored dough will reward you with a consistently delicious and reliable pizza base.
Overcoming Obstacles: Troubleshooting Common Pizza Dough Issues
Even seasoned bakers encounter challenges with dough. The beauty of baking is that most issues are solvable with a little understanding and patience. Don’t let a sticky mess or a flat crust deter you; troubleshooting is part of the learning process!
Dough That’s Too Sticky or Too Dry: Adjusting Hydration
Dough that’s too sticky often means it has too much hydration (too much water). Gradually add a tablespoon of flour at a time during kneading until it reaches a manageable consistency. Conversely, dough that’s too dry indicates insufficient water. Add lukewarm water, a teaspoon at a time, incorporating it fully until the dough becomes more pliable and cohesive. Remember, small adjustments make a big difference.
Why Your Dough Isn’t Rising: Yeast Activity and Environmental Factors
A common frustration is dough that simply won’t rise. The usual culprits are inactive or dead yeast, or an improper proofing environment. Ensure your yeast is fresh and your water temperature is correct (105-115°F/40-46°C). The proofing spot should be warm and draft-free; cold temperatures significantly slow down or halt yeast activity. Sometimes, simply giving it more time in a warmer spot is all it needs.
Tough or Chewy Crust: Understanding Over-Kneading and Under-Proofing
If your crust turns out tough and chewy rather than light and airy, it could be due to over-kneading or under-proofing. Over-kneading develops too much gluten, making the dough overly elastic and stiff. Under-proofing means the dough hasn’t had enough time to rise and develop its internal structure, leading to a dense result. Ensure you stop kneading once the dough passes the windowpane test and allow ample proofing time until it truly doubles in size.
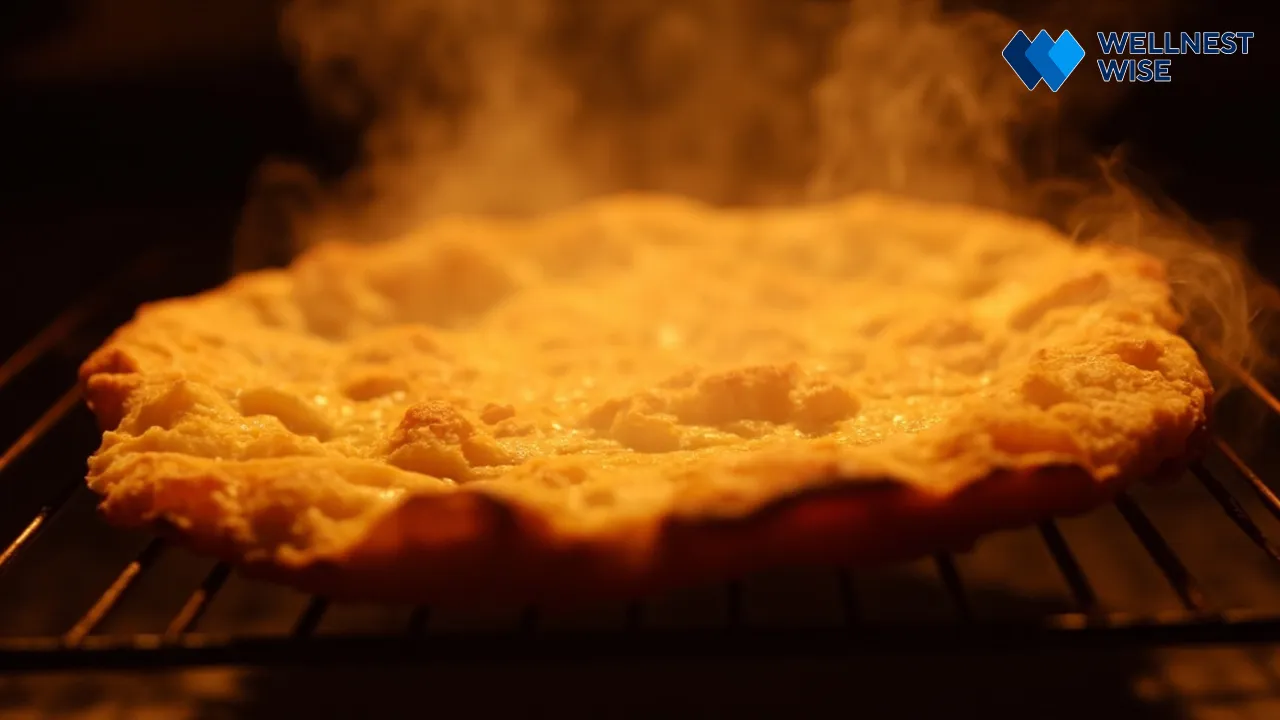
Achieving a Crispy Bottom: Oven Temperature and Baking Surfaces
A soggy bottom is a pizza tragedy. To achieve a perfectly crispy bottom, high heat is crucial. Preheat your oven to its highest setting (usually 450-500°F or 230-260°C) for at least 30-60 minutes with your baking surface inside. A pizza stone or steel conducts heat more effectively than a standard baking sheet, transferring intense heat directly to the crust for rapid cooking and superior crispness. Using a lightly floured pizza peel for transfer also helps prevent sticking.
The Joy of Creation: Your Journey to Delicious Homemade Pizza
Embarking on the journey of making homemade pizza dough is more than just learning a recipe; it’s an exploration into the heart of simple, wholesome cooking. Each time you blend flour, awaken yeast, and knead the dough, you’re not just preparing a meal, you’re creating a memorable experience and fostering a deeper connection with your food.
Embracing the Process and Personalizing Your Pizza
Don’t be afraid to experiment! Your kitchen is your culinary laboratory. Try different flours, infuse your dough with herbs like oregano or garlic powder, or adjust the proofing time to see how it affects the flavor and texture. The true reward lies in making it your own, creating a pizza that perfectly suits your taste and lifestyle. This hands-on approach allows for infinite personal touches, turning a basic recipe into a signature dish.
The Healthful Reward of Baking From Scratch
Beyond the fantastic taste, remember the significant health benefits of making pizza dough from scratch. You’re consciously choosing fresh, simple ingredients, avoiding unwanted additives, and often boosting the dietary fiber and nutrient content. This commitment to healthy eating, paired with the immense satisfaction of serving a truly homemade pizza to your loved ones, makes every effort worthwhile. So, roll up your sleeves, embrace the process, and enjoy the delicious, healthy results!
Conclusion & Takeaways
Creating homemade pizza dough is a truly rewarding endeavor that goes beyond just taste. It empowers you with nutritional control, offers endless customization, and provides a deeply satisfying culinary journey. By understanding key ingredients like the right flour and active yeast, mastering techniques like kneading and proofing, and embracing healthy adaptations, you can consistently produce a delicious, healthy pizza dough that rivals any pizzeria. Don’t be deterred by common challenges; with these troubleshooting tips, you’re well-equipped to create the perfect crispy, chewy crust every time. So, gather your ingredients, set aside some time, and transform your kitchen into a hub of wholesome, delicious pizza creation. Your taste buds—and your health—will thank you!
FAQ
Practical, scientific Q&A
Q: What are the key ingredients for a simple and healthy homemade pizza dough?
A: The foundational ingredients include flour (all-purpose, whole wheat, or a blend), active dry or instant yeast, lukewarm water, extra virgin olive oil, salt, and a pinch of sugar (to activate the yeast). For a healthier option, prioritizing whole wheat flour significantly boosts dietary fiber.
Q: How long does pizza dough need to rise for the best texture and flavor?
A: For the first rise (proofing), most doughs need 1 to 1.5 hours at room temperature, or until doubled in size. However, for enhanced flavor development and a more complex crust, consider cold fermentation in the refrigerator for 24-72 hours. This extended fermentation process allows for deeper flavors to emerge.
Q: Can I make pizza dough ahead of time and store it, and for how long?
A: Absolutely! Homemade pizza dough stores beautifully. In the refrigerator, you can keep dough balls (lightly oiled and in airtight containers) for 3-5 days. For longer storage, freeze portioned dough balls for up to 2-3 months. Remember to thaw frozen dough overnight in the fridge and allow it to come to room temperature and re-proof before shaping and baking.